Severe weather can affect a solar installation in ways that are not always immediately visible. Obvious damage may also indicate hidden issues that affect safety, energy production and the need for future solar system repairs. Understanding how to assess a system after strong winds, heavy rain, hail or lightning can help property owners identify potential problems before they develop into more significant faults. At Platinum Solar Group, the importance of prompt post-storm inspections is recognised as part of protecting system performance.
This article explains how to safely inspect a solar system after severe weather, what signs of damage or performance issues to look for and when professional assistance is required. It covers visual checks from the ground, inverter and monitoring app reviews, warning signs of electrical faults and the circumstances that warrant a professional inspection. By recognising potential issues early, property owners can help maintain system safety, reliability and energy generation following major weather events.
A careful visual inspection from the ground should be the first step after any major storm. This approach helps keep the process safe while still revealing obvious signs of damage that require professional attention. The goal is not to diagnose every technical issue but to identify anything that appears different from normal.
Walk slowly around the property and view the solar panels and roof from different angles. Use binoculars if available to get a clearer look without climbing a ladder. Take photos of anything unusual so it can be compared later or shown to a licensed electrician experienced in solar systems.
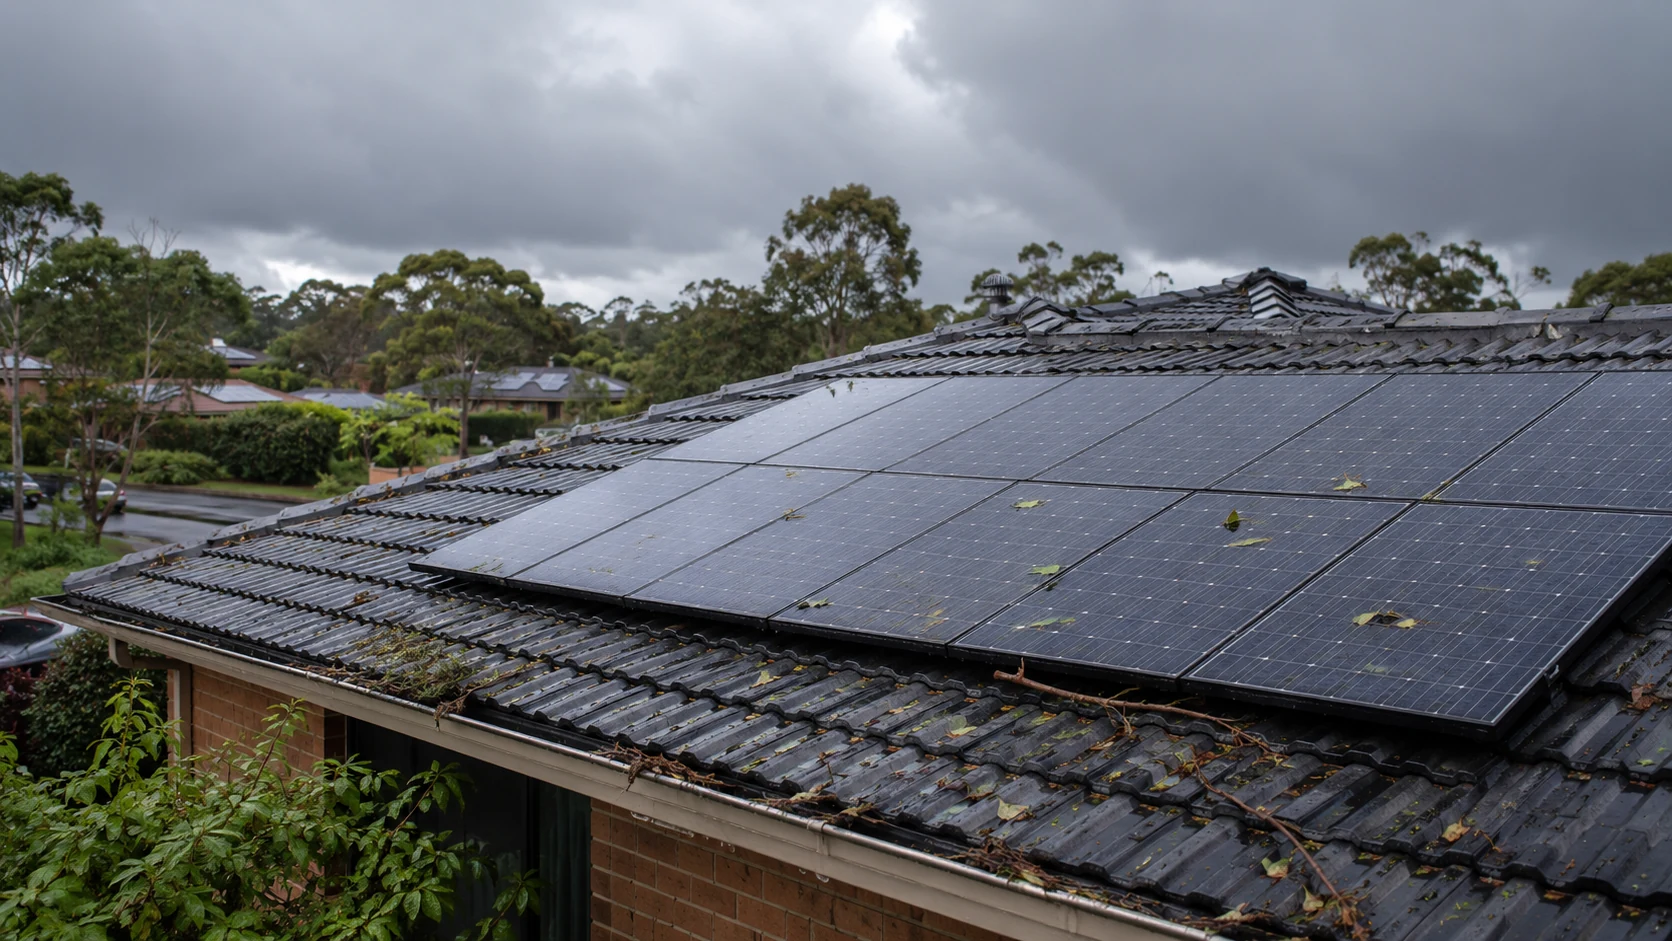
Begin by scanning the entire array for visible changes to the panels. Hail, strong winds, falling branches and flying debris can crack the panel glass or damage the frames.
Check for signs such as:
Hairline cracks can be difficult to see from a distance, but they may affect performance and allow moisture into the panel over time. Any panel that looks different from the others in colour, reflectivity or alignment should be noted for further inspection.
From ground level or a safe upper-storey window, visually assess the roof areas around and beneath the panels. Storm damage to the roof can compromise the mounting system and contribute to water ingress.
Look for shifted or missing roof tiles, lifted metal sheets, damaged flashing or loose ridge caps near the array. Panels that appear to sit higher or lower than before may indicate movement in the rails, clamps or mounting brackets. In high-wind events, slight movement can sometimes be seen as uneven panel rows or irregular gaps.
Pay attention to sagging sections of the roof, new shadow lines or visible gaps between panels and the roof surface. If structural movement is suspected, do not attempt to access the roof. Record what is visible and arrange a professional inspection.
Storm damage is often visible in the surrounding area before it becomes obvious on the solar system itself. Check for fallen branches, roof debris or loose objects resting against panels or rails. Any object in contact with the array can scratch the glass, damage frames or place stress on the mounting system.
Examine gutters and downpipes near the array. Blocked or overflowing gutters may indicate heavy leaf or debris buildup, which can contribute to unusual water runoff near roof coverings and mounting areas. Look for water stains along fascias, eaves or exterior walls.
Check that the inverter location and any accessible cabling near the ground are free from standing water, visible impact damage or signs of flooding on nearby walls. If electrical equipment has been exposed to flooding, do not touch the system and arrange an immediate professional assessment.
If the property has a solar battery, inspect the surrounding area for visible impact damage, water ingress or signs of flooding. Do not touch or restart a damaged battery system. Follow the displayed shutdown procedure only if it is safe to do so and arrange an inspection by a qualified technician. If there is smoke, fire or an unusual chemical smell, leave the area immediately and call Triple Zero (000).
Once the initial ground-level inspection has been completed, take a closer look at any areas that appear different from normal. This check should still be carried out from the ground, a safe upper-storey window or another secure vantage point. Never climb onto the roof or use a ladder to inspect solar panels after a storm.
The aim is to document visible damage to panels, mounting hardware and accessible cabling so a licensed electrician experienced in solar systems has useful information before attending the property.

Look closely at each visible panel surface. Hail, wind-blown debris and falling branches can crack, chip or puncture the glass and damage panel frames.
Look for signs such as:
Any damaged glass can allow moisture into the panel, reduce performance and create the risk of an electrical fault.
Also, note any panels that appear to be sagging, lifting at one corner or sitting at a different angle from neighbouring panels. Misalignment may indicate that mounting rails or roof fixings have shifted.
Strong winds can loosen or damage the rails, clamps and brackets that hold a solar system in place. From the ground, inspect the outer edges of the array and roof lines where mounting components may be visible.
Look for brackets that appear bent or pulled away from the roof and rails that are no longer straight. Gaps between panels and the roof that were not visible before the storm may suggest loosened mounts. Also, note any missing clamps or end caps along the edges of the array.
Scan the surrounding roof for missing or shifted tiles, damaged flashing or new water staining under the eaves. Any sign of roof movement around the mounting points should be treated as a priority issue.
Storms can pull conduit loose, expose wiring or damage electrical enclosures. From the ground, check all visible wiring from the array to the inverter and switchboard area.
Look for:
Pay particular attention to cabling along walls, beneath eaves and near entry points into the roof space. Do not touch any damaged wiring or equipment.
The inverter and monitoring app are often the first indicators of storm-related issues. A safe visual check of the inverter, followed by a review of recent monitoring data, can reveal faults before damage becomes obvious from the ground.
Treat the inverter display and monitoring app as an early warning system. After a storm, look for error messages, unusual shutdowns or sudden drops in energy production compared with normal performance.

Before approaching the inverter, confirm that the area is dry, accessible and free from obvious hazards. Never open covers or attempt to inspect live electrical equipment. Limit the check to what is visible from a safe position.
Look for water ingress around conduits or cabling, scorch marks, cracked housings or loose external switches. Any smell of burning, visible arcing, damaged wiring or signs of flooding is a red flag. Do not touch the equipment or attempt to operate switches in an unsafe area.
Check the inverter status lights and note any new error codes or warning messages. The meaning of indicator lights varies between inverter manufacturers and models, so refer to the system manual where available. A fault message may relate to the inverter, wiring, panels or the electricity network.
Common issues after storms may include inverter alerts, isolation faults or earth faults. These can indicate water ingress, damaged wiring or impact damage to panels. Grid voltage warnings may also appear, although these can relate to electricity network conditions rather than physical damage to the solar system.
Take a photo of any warning light, code or message so the information can be passed to a licensed electrician experienced in solar systems.
The monitoring app or web portal provides useful information about how the solar system behaved during and after the storm. Begin by checking the current system status. Many platforms clearly flag faults, offline inverters or communication errors.
If the app shows the system as offline but the internet connection at the property is working normally, the problem may relate to the inverter, communications equipment or cabling rather than a simple Wi-Fi issue.
If the system supports panel-level monitoring, check whether one panel or a small group of panels is producing significantly less energy than the rest. This information can help an electrician narrow down the likely cause of the fault.
The Australian Government also explains how homeowners can monitor their solar system to track generation, identify faults and check whether a battery is charging and discharging as expected.
After a storm, even minor panel damage, debris buildup or loose wiring can reduce how much power the system generates. Monitoring for sudden or unusual output changes is one of the quickest ways to identify a possible issue without climbing onto the roof or touching electrical equipment.
A consistent drop in production, particularly after the weather has returned to normal, may be the first sign of cracked panels, loose wiring, water ingress or inverter issues. Monitoring can also help identify when the change occurred, which may assist with fault finding, warranty assessments or insurance claims.
Once the storm has passed and conditions have returned to normal, compare the current system output with its typical performance before the event.
Use the monitoring app, web portal or inverter display to review:
Short dips during passing cloud cover are normal. However, long periods of unusually low output or a consistent new reduction in peak generation may indicate a fault that needs investigation.
Not all storm damage affects every panel. Some problems appear as irregular or partial losses of output.
Warning signs include:
A sudden drop to zero output during daylight may indicate a serious issue. Do not attempt to reset the system, open covers or handle damaged equipment. Contact a licensed electrician experienced in solar systems.
Storms can coincide with seasonal changes that naturally affect solar production. Shorter winter days, lower sun angles and increased cloud cover can reduce output even when the system is operating normally.
To avoid false alarms, compare post-storm performance with recent days that had similar weather conditions. Where historical data is available, compare the system with the same season in a previous year.
A moderate decrease may be normal for the time of year. A sharp reduction that does not match the usual seasonal pattern is more likely to relate to storm impact, debris buildup, new shading from a fallen branch or damage to the system.
A sudden reduction in output is different from gradual ageing. Understanding why solar systems lose performance over time can help property owners recognise when a change warrants further investigation.
Any sign of damage after a storm should be taken seriously. A solar installation includes electrical equipment on the roof and around the property, so the priority is to stay safe, document the issue and arrange professional assistance.
Do not climb onto the roof, touch damaged panels or attempt repairs yourself.
If there is visible or suspected damage, such as cracked panels, loose cables, scorch marks, water ingress or flooding near electrical equipment, do not touch damaged components or attempt repairs.
Solar systems can remain energised even when the mains electricity supply has been turned off. If the equipment is dry, accessible and safe to approach, follow the shutdown procedure displayed near the inverter or switchboard. The correct steps depend on the system design and should be followed in the order shown on the label.
Do not climb onto the roof, operate rooftop equipment or approach switches surrounded by water. If the shutdown procedure cannot be followed safely, leave the area and contact a licensed electrician experienced in solar systems.
If there is smoke, fire, visible arcing or an immediate risk to people or property, move to a safe location and call Triple Zero (000).
Before a technician attends the site, create a clear record of the damage. This can assist with fault diagnosis, warranty assessments and insurance claims.
From ground level or a safe upper-storey window, take wide photos of the array and closer photos of visible issues such as:
Record the date and approximate time of the storm, whether hail was observed and whether the property experienced a power outage. Keep screenshots from the monitoring app and note any changes in system output.
After a major weather event, it may not be obvious whether a solar system has suffered hidden damage. Some issues are visible from the ground, but many safety and performance problems can only be identified with specialist testing equipment.
A professional inspection should be considered after storms involving damaging winds, hail, falling branches, flying debris or localised flooding. If there is any doubt about the condition of the panels, wiring or mounting system, it is safer to arrange an inspection rather than wait for a fault to worsen.
The Australian Government provides further guidance on maintaining and checking your solar system, including the importance of inspecting electrical components, cables, isolator switches and inverter fault history.
A professional inspection should be treated as a priority after conditions such as:
Even when panels appear intact from the ground, microcracks in cells, damaged backsheets or loosened fixings may only be identified through close inspection, electrical testing or thermal imaging.
Any visible damage should be professionally assessed before the system is returned to normal operation.
Monitoring data and inverter warning messages can indicate that a professional inspection is required.
Contact a licensed electrician experienced in solar systems if:
A licensed electrician experienced in solar systems can test for earth faults, water ingress, insulation breakdown, damaged panels and string imbalances that are not visible externally. Early investigation can prevent a minor issue from developing into a complete system failure or electrical hazard.
Severe weather can place stress on solar panels, mounting systems, wiring and associated electrical components. A careful visual inspection from the ground, combined with a review of inverter status indicators and monitoring data, can help identify impact damage, water ingress, mounting movement and unexpected performance reductions.
Where faults or visible damage are identified, professional solar system maintenance and repairs can help restore safe and reliable operation. By responding promptly after storms, documenting visible damage and arranging professional inspections where necessary, solar system owners can minimise downtime, protect warranties and maintain reliable energy production.


.webp)

.webp)